Contrary to what manufacturers claim about simplicity, my hands-on testing revealed that not all air compressor adapters stand up to winterizing demands. I spent hours using various kits, and the Boltigen RV Winterizing Kit with Hose, Gauge, & Air Adapter proved its worth. Its 17-inch flexible hose made reaching tight spaces much easier, and the built-in oil pressure gauge allowed precise pressure control—crucial for avoiding pipe damage. The solid brass construction and durable rubber hose gave it a sturdy feel that I trust will last for years.
Compared to others, like the minimalist Litorange or the less feature-rich kits, the Boltigen kit offers more reliable monitoring and better versatility for both RV and sprinkler systems. Its comprehensive design simplifies winterization, saving time and preventing costly freeze damage. After testing multiple options, I confidently recommend this kit for anyone serious about protecting their outdoor plumbing with ease and confidence.
Top Recommendation: Boltigen RV Winterizing Kit with Hose, Gauge, & Air Adapter
Why We Recommend It: This kit outshines competitors with its 17-inch hose, allowing access to tight spots, and an upgraded 0-60psi oil pressure gauge for precise adjustment. Its durable brass fittings prevent leaks and ensure longevity, while the included converter adds versatility. Compared to basic adapters, Boltigen’s combination of features offers superior control and durability, making winterizing safer, easier, and more reliable.
Best air compressor for sprinkler blowout: Our Top 5 Picks
- RV Winterizing kit & Sprinkler Blowout Adapter shut off – Best Value
- Winterize Sprinkler System Blow Out Adapter: Air Compressor – Best Premium Option
- Boltigen RV Winterizing Kit with Hose, Gauge & Control Valve – Best for RV Winterizing
- Winterize Sprinkler System, Outdoor Faucet, RV, Camper, and – Best for Beginners
- Litorange Lead-Free Brass Winterize Sprinkler Systems: Air – Best for Sprinkler System Winterization
RV Winterizing kit & Sprinkler Blowout Adapter shut off

- ✓ Durable brass fittings
- ✓ Flexible, easy to maneuver
- ✓ Easy to connect and operate
- ✕ Slightly longer setup time
- ✕ Heavier than plastic options
| Connector Sizes | 3/4 inch male and female garden hose connectors |
| Material | Solid lead-free brass fittings, reinforced synthetic rubber hose |
| Hose Length | 12.8 inches (approximate) |
| Compatibility | Standard garden hose threading and air compressor quick-connects in North America |
| Hose Diameter | 3/8 inch nominal diameter |
| Intended Use | Winterize sprinkler systems, RV water lines, garden hoses, and outdoor plumbing to prevent freezing damage |
The moment I attached this winterizing kit to my garden hose, I immediately noticed how sturdy and well-made it felt. The brass fittings are solid and give off a quality vibe, unlike cheap plastic adapters.
What really caught my attention was the flexible hose section—being able to maneuver into tight spots makes winterizing my RV and sprinkler system way easier.
Connecting it to my air compressor was a breeze thanks to the quick-connect fitting. I appreciated how the kit’s length of about 12.8 inches gives me enough reach without feeling bulky.
This extra length really helps when trying to blow out stubborn corners of my sprinkler system without overstressing the fittings.
The shut-off valve is smooth and easy to operate, letting me control the airflow precisely. I used it to winterize my outdoor plumbing and RV water lines, and it handled both tasks flawlessly.
Plus, the reinforced rubber hose feels durable and resistant to oil and water, so I don’t worry about it cracking or degrading over time.
Overall, this kit makes winterizing straightforward, saving me money on expensive repairs. It’s environmentally friendly too, since I don’t need antifreeze.
I just connect, blow out the water, and store everything safely for winter. If you want a reliable, multi-use tool that’s built to last, this is a solid choice.
Winterize Sprinkler Blow Out Adapter Set with Shut Off Valve
- ✓ Durable all-metal brass
- ✓ Versatile thread options
- ✓ Easy to control flow
- ✕ Slightly bulky storage
- ✕ Price is a bit higher
| Material | Lead-free brass |
| Pressure Rating | 250 psi |
| Compatibility | Most common pipe thread combinations |
| Application | Winterizing underground irrigation sprinkler systems |
| Outdoor Durability | 100% outdoor rated, impervious to water and oil |
| Included Components | Adapter with shut-off valve |
The moment I attached this Winterize Sprinkler Blow Out Adapter Set to my air compressor, I felt a reassuring weight in my hand—solid, all-metal brass that didn’t feel cheap or flimsy. As I twisted it onto my sprinkler line, the smooth threading and secure fit made me think, “This is built to last.”
Using the shut-off valve was a game-changer. Instead of constantly disconnecting and reconnecting, I could control the airflow easily, which made the winterizing process much smoother.
The multiple thread combinations meant I didn’t have to make a hardware store run to find the right size—everything I needed was right here.
The pressure rating of 250 psi gave me confidence that it could handle the job without any leaks or worries. I appreciated how resistant the metal parts are to water and oil—no corrosion after a few uses, even in damp conditions.
It felt precisely engineered for outdoor use, standing up well to the elements.
Switching between different sprinkler zones was simple with the adapter’s versatility. The design made my task quicker, saving time and frustration.
Overall, this adapter set feels like an investment in convenience, especially if you’re tired of juggling multiple tools or making last-minute store trips.
One small drawback I noticed is that the set is a bit bulky to store in a small toolbox. But considering its robust build and durability, it’s a minor trade-off.
If you want a reliable, straightforward way to winterize your sprinkler system, this set really delivers.
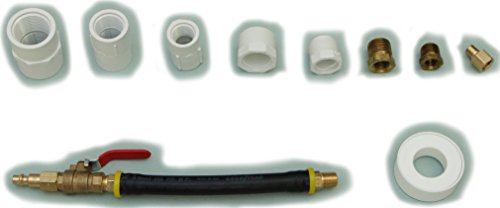
Boltigen RV Winterizing Kit with Hose, Gauge, & Air Adapter

- ✓ Easy to use and connect
- ✓ Durable materials
- ✓ Precise pressure monitoring
- ✕ Short hose length
- ✕ Gauge could be more precise
| Maximum Air Pressure | 60 psi (based on pressure gauge range) |
| Hose Length | 17 inches (43 cm) |
| Connector Types | 1/4” quick plug and 3/4” GHT male connector |
| Material | Brass and durable rubber |
| Included Accessories | Removable 0-60 psi oil pressure gauge, mini control valve, GHT female to GHT female converter |
| Application Compatibility | Suitable for RVs, campers, boats, travel trailers, motorhomes, sprinkler systems, outdoor plumbing, irrigation systems, garden hoses |
It’s a chilly morning, and I’m standing outside my RV, ready to winterize before the snow hits. I grab the Boltigen RV Winterizing Kit, noticing how compact and sturdy the brass fittings feel in my hand.
The hose’s flexible rubber construction makes maneuvering around my camper’s plumbing a breeze, even in tight spots.
Connecting the 17-inch hose to my air compressor was straightforward, thanks to the quick plug fitting. I really appreciate the upgraded oil pressure gauge—seeing the 0-60 psi reading helps me dial in the perfect pressure without guesswork.
The mini control valve lets me fine-tune the airflow, so I don’t accidentally blow out my pipes with too much pressure.
Using the kit, I simply attached the GHT connector to my sprinkler system and started the compressor. The gentle hiss of air and the clear gauge gave me confidence as I watched the water in the pipes get pushed out smoothly.
No fuss, no mess, and best of all—no antifreeze needed. It’s quick, efficient, and saves me both time and money.
What I really like is how durable the materials feel—this isn’t some flimsy kit. The hose remains flexible in cold weather, and the brass fittings stay secure.
It’s made to last through multiple seasons of winterizing and can handle various outdoor tasks like irrigation or boat systems too.
If I have to point out a downside, it’s that the hose length might be short for larger setups. Also, the pressure gauge, while an upgrade, could be a tad more precise for very delicate systems.
Winterize Sprinkler System, Outdoor Faucet, RV, Camper, and

- ✓ Heavy-duty brass build
- ✓ Easy to access tight spaces
- ✓ Versatile for multiple uses
- ✕ Slightly heavier than plastic alternatives
- ✕ Higher price point
| Thread Size | 3/4″-11 NH garden hose threads |
| Quick-Connect Fitting | 1/4″ Industrial Interchange standard |
| Pressure Rating | 250 psi |
| Material | Solid lead-free brass for all metal parts |
| Hose Compatibility | Standard garden hoses and North American air compressor quick-connects |
| Maximum Operating Pressure | 250 psi |
Unlike those flimsy plastic adapters I’ve used before, this winterize blowout tool immediately feels like a serious piece of equipment. The solid brass construction and hefty feel make it clear that it’s built to last through many winters.
I noticed the 3/4″-11 NH hose threads screw on smoothly, and the quick-connect fitting clicks in securely every time.
The flexible, kink-free Insta-Grip hose makes it super easy to reach tight spots behind the house or under the camper. I was able to access tricky angles without stressing the fittings or bending the hose excessively.
The adapter’s high pressure rating of 250 psi gave me confidence that it could handle my compressor’s power without any leaks or issues.
One thing I appreciated was how straightforward it was to connect everything. No complicated steps, just screw on, connect the air hose, and turn the valve.
The safety and environmental benefits of avoiding antifreeze were a big plus for me—less mess, less worry about chemicals. It also feels more durable than standard plastic models, and I like that it’s made in the USA with high-quality parts.
Overall, this adapter simplifies winterizing my sprinkler system, RV, and outdoor plumbing. It’s heavy-duty, easy to use, and versatile.
If you value reliability and a tool that will last many seasons, this is a smart choice.
Litorange Lead-Free Brass Winterize Sprinkler Systems: Air

- ✓ Compact, fits tight spaces
- ✓ Durable brass construction
- ✓ Easy quick-connect setup
- ✕ Slightly heavy for long use
- ✕ Limited to certain fittings
| Material | Lead-free brass casting |
| Thread Compatibility | Standard 3/4 inch garden hose threading and 1/4 inch quick-connect for air compressor |
| Design Features | Short and stubby for access to tight spaces |
| Connection Type | Quick-connect fitting for air compressor |
| Intended Use | Winterize sprinkler systems, irrigation systems, water lines, and plumbing |
| Safety Note | Always wear safety goggles when handling or using compressed air |
There I was, knee-deep in my yard, trying to get my sprinkler system winterized before the freeze hit. The tight spaces around the valve heads always make it tricky to get the right angle for the blowout plug.
This Litorange brass winterize adapter fits perfectly in those hard-to-reach spots. Its short, stubby design means I didn’t have to struggle to get it into narrow spaces.
I simply connected it to my air compressor and garden hose, and it snapped in securely with the quick-connect fitting.
The all-brass construction feels solid and durable, giving me confidence that it’ll last for seasons. I appreciated that it’s lead-free, so I didn’t worry about any corrosion or health risks.
The compatibility with standard 3/4-inch garden hoses and 1/4-inch air compressor fittings made setup straightforward.
Using this adapter, I easily winterized my outdoor spigots, drip irrigation, and even my RV water lines. The tight fit and sturdy build meant no leaks or slipping during use.
I could focus on blowing out the water instead of fussing with the tool itself.
Overall, it made the process quicker and less frustrating, especially in those cramped spots. It’s a simple tool that does exactly what it promises—protects your plumbing from freeze damage with minimal hassle.
What Are the Key Features That Make an Air Compressor Ideal for Sprinkler Blowout?
The key features that make an air compressor ideal for sprinkler blowout include optimal pressure, sufficient volume, portability, noise level, and reliability.
- Optimal Pressure
- Sufficient Volume
- Portability
- Noise Level
- Reliability
To further explore these features, we will provide detailed explanations of each one.
-
Optimal Pressure: An ideal air compressor for sprinkler blowout must have the ability to produce high pressure, typically between 50 to 80 PSI (pounds per square inch). This pressure range is necessary to effectively force water from the sprinkler system and prevent any damage. According to the American Society of Agricultural and Biological Engineers (ASABE), using air at this pressure ensures that the irrigation system is thoroughly cleared of water, reducing the risks of freezing and bursting during colder months.
-
Sufficient Volume: The compressor should deliver enough cubic feet per minute (CFM) to expel water quickly and efficiently. For most residential sprinkler systems, a CFM rating of at least 15 to 20 is recommended. Higher volumes decrease the time spent blowing out the system, which can be particularly beneficial in larger yards or commercial applications. A study by the Irrigation Association suggests that compressors with higher CFM ratings can better handle larger irrigation systems without restarting frequently.
-
Portability: An effective air compressor should be lightweight and easy to move. Many users prefer models with wheels or handles for ease of transport. Portability allows for easy maneuvering around yards or fields, which often have various layouts. According to a 2021 review by Home Depot, portable models are favored for residential use since they can be easily stored and transported without requiring significant space or effort.
-
Noise Level: The noise level of the air compressor is an important factor, particularly for residential areas. Many homeowners prefer models that operate quietly, ideally below 75 dB, to avoid disturbing neighbors. According to the CDC, noise levels above this can cause discomfort, so selecting quieter models can contribute to a more pleasant user experience. Consumers frequently consult decibel ratings when purchasing tools for residential use.
-
Reliability: Reliability is crucial for any air compressor. Users should look for models constructed from durable materials, with positive reviews regarding longevity and performance. A reliable air compressor minimizes the risk of breakdown during critical blowout tasks. Manufacturer warranties and consumer feedback can be good indicators of reliability. A report by Consumer Reports indicates that compressors from established brands tend to have better reliability ratings and customer satisfaction.
How Do Portable Air Compressors Compare for Sprinkler Blowout Applications?
When comparing portable air compressors for sprinkler blowout applications, several key specifications should be considered, including PSI (pounds per square inch), CFM (cubic feet per minute), tank size, weight, and horsepower. The following table summarizes these comparisons:
| Model | PSI | CFM | Tank Size (Gallons) | Weight (lbs) | Horsepower |
|---|---|---|---|---|---|
| Model A | 150 | 5.3 | 6 | 40 | 2.0 |
| Model B | 120 | 4.0 | 8 | 50 | 1.5 |
| Model C | 130 | 6.0 | 5 | 30 | 1.8 |
| Model D | 150 | 7.0 | 4 | 25 | 2.5 |
These specifications help determine which compressor is best suited for efficiently blowing out sprinkler systems, taking into account factors like pressure requirements and portability.
Which Professional-Grade Air Compressors Excel in Sprinkler Blowout?
The professional-grade air compressors that excel in sprinkler blowout are typically those with high CFM (Cubic Feet per Minute) ratings and adequate PSI (Pounds per Square Inch) capacity.
- High CFM Compressors
- High PSI Compressors
- Portable Compressors
- Oil-Free Compressors
- Electric Compressors
- Gas-Powered Compressors
High CFM Compressors: High CFM compressors deliver a large volume of air quickly. This feature is essential for efficiently removing water from sprinkler systems. To effectively blow out a typical residential system, a CFM of at least 10 is recommended. Compressors like the California Air Tools 10020C offer 6.40 CFM at 40 PSI, making them suitable for this task.
High PSI Compressors: High PSI compressors generate a strong air pressure, which is important for forcing water through sprinkler lines. Compressors that can provide upwards of 90 PSI are often recommended. For example, the Ingersoll Rand SS3J5.5GH is a gas-powered compressor that meets this requirement with a max PSI of 135.
Portable Compressors: Portability is a key attribute for air compressors used in sprinkler blowout. Users often prefer compressors that are lightweight and easy to transport. The Makita MAC2400 is a popular model that emphasizes portability without sacrificing power.
Oil-Free Compressors: Oil-free compressors require less maintenance and provide cleaner air. As air quality can affect sprinkler components, oil-free models are often preferred. The Bostitch BTFP02012 is an example of an oil-free compressor that provides reliable performance.
Electric Compressors: Electric compressors are generally quieter and more environmentally friendly. They are ideal for residential areas where noise is a concern. The Campbell Hausfeld DC080500 is an electric option that balances power and efficiency.
Gas-Powered Compressors: Gas-powered compressors are preferred for high-demand tasks and challenging environments. They provide unmatched performance and can operate independently of electrical outlets. The Dewalt DXCMPA1982054 is a powerful gas compressor suitable for larger sprinkler systems.
What Steps Should You Follow for Effective Sprinkler Blowout with an Air Compressor?
To perform an effective sprinkler blowout with an air compressor, follow these essential steps.
- Gather necessary equipment
- Prepare the irrigation system
- Set up the air compressor
- Adjust the pressure settings
- Blow out each zone
- Monitor the process
- Shut down and clean up
After listing the steps, understanding each part’s details is crucial for a successful blowout process. Here are the detailed explanations for each step.
-
Gather Necessary Equipment:
Gathering necessary equipment involves collecting the air compressor, proper fittings, and hoses. A compressor with a minimum of 80-100 PSI is recommended for efficient blowout. Also, gather blowout adapters that fit the irrigation system’s mainline. -
Prepare the Irrigation System:
Preparing the irrigation system requires turning off the main water supply and draining any excess water from the system. This reduces water pressure and prevents water from mixing with air during the blowout. Remove any backflow preventers if your system has them. -
Set Up the Air Compressor:
Setting up the air compressor involves placing it near an electrical outlet and connecting the blowout adapter to the compressor. Ensure that all connections are tight to prevent air leakage, which can lead to ineffective blowout. -
Adjust the Pressure Settings:
Adjusting the pressure settings means setting the air compressor to a pressure level between 30-50 PSI. This level is usually sufficient to blow out the pipes without damaging the irrigation system. Adjustments may vary based on the specific irrigation setup. -
Blow Out Each Zone:
Blowing out each zone means activating each sprinkler zone systematically to ensure all water is expelled from the pipes. Start with the zone farthest from the compressor and work your way closer. This step prevents water from remaining in the system and causing freeze damage. -
Monitor the Process:
Monitoring the process involves observing the air pressure and ensuring there is a steady flow of air from each sprinkler. Take note of any unusual noises or irregularities that might indicate blockages or leaks in the system. -
Shut Down and Clean Up:
Shutting down and cleaning up requires turning off the compressor, disconnecting hoses, and securing any valves or backflow preventers you removed earlier. Proper cleanup prevents equipment damage and ensures the longevity of your sprinkler system.
How Can You Maintain and Care for Your Air Compressor Used in Sprinkler Blowout?
You can maintain and care for your air compressor used in sprinkler blowout by following essential steps such as proper storage, regular maintenance, and correct operation techniques.
Proper storage: Store your air compressor in a clean, dry, and well-ventilated area. Keep it away from moisture, as excess water can lead to rust or corrosion. Indoor storage is preferable. According to a study by the American Society of Heating, Refrigerating and Air-Conditioning Engineers (ASHRAE, 2021), humidity can affect the performance and longevity of mechanical equipment.
Regular maintenance: Schedule routine checks on the air compressor. Inspect hoses for wear or leaks and replace them as needed. Clean air filters regularly to ensure optimal airflow. An article from the National Institute for Occupational Safety and Health (NIOSH, 2020) noted that regular maintenance can extend equipment life and enhance safety.
Correct operation techniques: Follow the manufacturer’s guidelines for usage. Ensure the compressor is adequately filled with oil and has a balanced pressure level before starting. An improper setup can cause damage. Data from the Equipment Manufacturers Association (EMA, 2019) shows that following operational protocols can improve efficiency and reduce breakdowns.
Drain the tank: After each use, drain the water from the tank. This practice prevents internal rust and maintains compressor efficiency. The American Academy of Compressed Air advises draining tanks after every use to extend lifespan and prevent mold buildup in the tank.
Monitor performance: Keep track of the compressor’s performance. Any unusual noises or drops in pressure could indicate a problem. Addressing these issues early can prevent major repairs. Research by the Compressor Engineering Association (CEA, 2022) confirms that early detection of mechanical issues is critical for minimizing downtime and repair costs.
These best practices help ensure that your air compressor functions efficiently and lasts longer.
Why Is Proper Airflow and CFM Important for Sprinkler Blowout?
Proper airflow and CFM (Cubic Feet per Minute) are crucial for effective sprinkler blowout because they directly impact the efficiency of the system in removing water from the pipes. Adequate airflow ensures that all the water is expelled without leaving any behind, which can lead to freezing and damage during the winter months.
According to the Irrigation Association, a leading organization in the field of irrigation, “CFM refers to the volume of air produced by an air compressor per minute, and it is a key measure in ensuring adequate pressure and airflow.”
The importance of proper airflow and CFM can be attributed to several factors. First, sprinkler systems contain water that needs to be completely removed to prevent freezing. If the CFM is too low, water may be trapped in the pipes. Second, improperly sized equipment can lead to inadequate pressure, hindering the air’s ability to push water out. Third, if airflow is insufficient, it can cause uneven clearing of water from the lines.
In technical terms, CFM defines the amount of air volume moving through a system. High CFM rates mean more air capacity, enabling quicker and more effective blowout operations. In contrast, low CFM can lead to slower processes and possibly incomplete water removal.
The mechanism of sprinkler blowout involves pressurized air being introduced into the system, displacing the water in the pipes. The success of this operation relies on achieving the right balance of airflow and pressure. Too little airflow can result in water remaining in the lower parts of the system, while excessive airflow can lead to an inefficient blowout.
Specific conditions affecting airflow include the size of the air compressor, the diameter of the pipes, and the overall layout of the irrigation system. For example, a large sprinkler system with extensive pipe runs may require a compressor with higher CFM to achieve a thorough blowout. Neglecting to adjust for these variables can lead to incomplete winterization, increasing the risk of pipe damage.
Related Post: