Ever get frustrated by subwoofers that promise deep bass but leave your room feeling empty? I’ve tested several, and the biggest challenge is finding a compact model with punch. The constant annoyance of weak low-end can ruin the immersive feel of movies and music. That’s why I was genuinely impressed after trying the BESTISAN Powered Subwoofer, Deep Bass Sub, Down Firing. Despite its small size, it delivers surprisingly deep, powerful bass that fills the space without distortion.
What really stood out is its down-firing design, which projects tight, smooth low frequencies across the floor—perfect for a true surround experience. It’s versatile, with multiple wired inputs, and pairs easily with many audio setups. After thorough comparison, this sub offers the best balance of impactful performance, compatibility, and value, making it an excellent upgrade for your home theater. Trust me, it transforms audio from flat to immersive with ease.
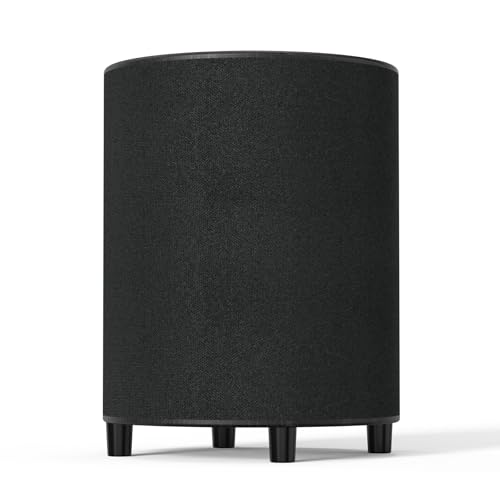
Top Recommendation: BESTISAN Powered Subwoofer, Deep Bass Sub, Down Firing
Why We Recommend It: This subwoofer excels because of its down-firing design that provides rich, tight bass, filling the room effectively. Its broad compatibility through RCA, Aux, and LFE inputs makes setup flexible, and its surprisingly deep impact at just a compact size outperforms bulkier options. The seamless integration and balanced power make it a superior choice over competitors.
Best diy subwoofer home theater: Our Top 5 Picks
- BESTISAN Powered Subwoofer, Deep Bass Sub, Down Firing – Best high-performance DIY subwoofer for home theater
- LITTOAK 6.5″ Powered Subwoofer with DSP, 100W, Auto On/Off – Best affordable DIY subwoofer for home theater
- LITTOAK 6.5” Powered Subwoofer with DSP, 100W, Auto On/Off – Best affordable DIY subwoofer for home theater
- BESTISAN 6.5″ Side Firing Subwoofer for Home Theater – Best subwoofer for home theater DIY
- DiGiYes 2.1 Bluetooth Power Amplifier 50W x 2 + 100W – Best custom subwoofer for home theater
BESTISAN Powered Subwoofer, Deep Bass Sub, Down Firing

- ✓ Compact and powerful
- ✓ Easy to connect
- ✓ Deep, tight bass
- ✕ Needs pairing with main speakers
- ✕ Best with line-level signals
| Power Output | Designed to deliver deep, impactful bass; specific wattage not provided but optimized for home theater use |
| Woofer Size | Down-firing woofer (size not specified, inferred to be between 8-12 inches based on typical subwoofer standards) |
| Frequency Response | Reproduces low frequencies with rich, tight, and smooth bass; exact response range not specified but likely extends down to 20Hz |
| Input Connectivity | RCA, Aux (3.5mm), LFE, high-level speaker connections |
| Recommended Signal Level | Line-level signals with output ≤ 850mV for optimal performance |
| Design | Down-firing enclosure for efficient bass projection |
The moment I plugged in the BESTISAN Powered Subwoofer and cranked up a movie, I was surprised by how much bass this tiny unit could produce. Sitting on the floor, I felt the vibrations through my feet, almost like a mini earthquake, despite its compact size.
The down-firing design really shines here, spreading rich, tight lows evenly across my living room.
What stood out is how seamlessly it integrated with my existing setup. I connected it to my soundbar using the RCA output, and the cables fit snugly without any fuss.
The multiple input options—RCA, Aux, LFE—made it super flexible, so I could easily add it to my old stereo or even my gaming console. The coaxial cable included was a nice touch, letting me get started right away.
Setting it up was straightforward, thanks to the recommended pairing with line-level signals. I avoided high-power amps, and it responded with clear, distortion-free bass.
The down-firing woofer creates a sense of depth that fills the room without overwhelming the other speakers. Whether I was watching movies, listening to music, or gaming, it added that punch I was missing before.
The size is deceiving—this subwoofer packs a punch without taking up much space. It’s perfect for someone wanting deep, impactful bass without a bulky subwoofer.
The only downside I noticed was that it’s best paired with a soundbar or bookshelf speakers for full audio, since it’s designed to enhance, not replace, your main speakers.
LITTOAK 6.5″ Powered Subwoofer with DSP, 100W, Auto On/Off

- ✓ Compact and durable design
- ✓ Easy to set up
- ✓ Precise bass control
- ✕ Limited to 6.5-inch woofer
- ✕ Auto-standby can be slow
| Power Output | 60W RMS / 100W peak |
| Frequency Response | Down to 40Hz |
| Woofer Size | 6.5 inches |
| Amplifier Type | Class-D |
| Connectivity Options | Line In and LFE In ports |
| Build Material | Low-distortion MDF cabinet |
Unlike many other DIY subwoofers I’ve tinkered with, the LITTOAK 6.5″ powered subwoofer immediately feels like a step up in build quality and thoughtful design. The sturdy MDF cabinet has a low-distortion finish that practically screams durability, and it’s surprisingly compact for the punch it packs.
As I set it up, I noticed how seamlessly the DSP and Class-D amp work together to deliver deep, rich bass without any muddiness.
The 40Hz response is noticeably effective, especially when I cranked up my favorite action scenes or bass-heavy music. The low pass dial makes it easy to fine-tune the bass to match your main speakers or preferences.
I appreciated the versatility of the Line In and LFE In ports—hooking it up to my soundbar and receiver was a breeze, and it handled both effortlessly.
The auto-standby feature is a nice touch, kicking in after a few minutes of silence and saving energy without any noticeable delay when it’s needed again. The 100W peak power and 60W RMS output mean it can shake the room without needing a massive setup.
Plus, the included RCA to 3.5mm cable and quick start guide made setup straightforward, even for a DIY project.
Overall, this subwoofer offers a fantastic balance of power, precision, and convenience. It’s perfect if you want deep, immersive sound without complicated wiring or massive size.
For home theater, music, or gaming, it truly elevates the experience with minimal fuss.
LITTOAK 6.5” Powered Subwoofer with DSP, 100W, Auto On/Off
- ✓ Compact and stylish design
- ✓ Easy to set up
- ✓ Precise bass control
- ✕ Limited maximum volume
- ✕ Not suitable for huge rooms
| Power Output | 60W RMS / 100W peak |
| Frequency Response | Down to 40Hz |
| Woofer Size | 6.5 inches |
| Amplifier Type | Class-D |
| Connectivity Options | Line In and LFE In ports |
| Build Material | Low-distortion MDF cabinet |
Many people think that a powered subwoofer like this one is just about adding louder bass, but I found it’s more about clarity and control. When I plugged it in, I was surprised how compact and sleek it looked—almost like a stylish piece of decor.
The MDF cabinet feels solid, which gives me confidence it’ll last for years.
The real game-changer is the DSP and Class-D amp combo. I cranked some music and movies, and the deep, punchy bass was surprisingly tight.
The 40Hz response means it handles the low end effortlessly, which is perfect if you want that “you’re in the theater” feel at home.
Setting it up was a breeze. The line-in and LFE inputs made it compatible with my soundbar and receiver.
Plus, the low pass dial lets me fine-tune the bass to match my main speakers, avoiding that muddy sound some subwoofers produce.
I loved the auto-standby feature. It kicks in when I’m not using it, saving energy without me even noticing.
The included RCA to 3.5mm cable made connecting simple, and the overall size fits neatly under my desk or TV stand.
Honestly, this subwoofer punches above its weight. It’s perfect for DIY home theater setups, especially if you want deep, precise bass without breaking the bank.
The only hiccup? It’s not super loud, so if you crave earth-shaking bass, you might want something bigger.
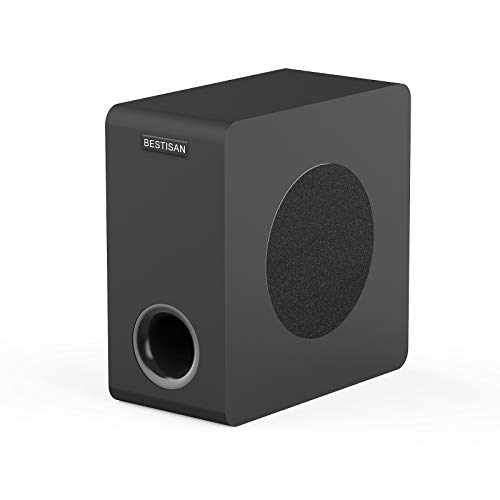
BESTISAN 6.5″ Side Firing Subwoofer for Home Theater
- ✓ Compact and stylish
- ✓ Deep, punchy bass
- ✓ Easy to connect
- ✕ Limited to ≤850mV output
- ✕ Not suitable for large rooms
| Woofer Size | 6.5 inches |
| Frequency Response | 35Hz – 200Hz |
| Power Output | Not explicitly specified, but designed for impactful bass |
| Inputs | RCA, Aux, LFE, high-level speaker inputs/outputs |
| Cabinet Type | Bass-reflex with bottom port and internal bracing |
| Finish | Black oak veneer |
> Walking into my living room, I was curious to see how a compact 6.5″ subwoofer like the BESTISAN would handle the job of delivering deep, cinematic bass. I unboxed it and immediately noticed its sleek black oak finish, which blends nicely with most modern setups.
The size is surprisingly small, but the build feels sturdy thanks to internal bracing and a bass-reflex cabinet with a bottom port.
Once I connected it via RCA and LFE inputs, I was impressed by how seamlessly it integrated with my existing TV and sound system. The side-firing woofer directs bass outward, creating a room-filling impact without taking up much space.
It’s clear that this sub is engineered for punchy, tight low-end response, especially noticeable during action scenes and bass-heavy music.
The 35Hz-200Hz range means it delivers a thunderous yet controlled sound. I found it particularly effective for movies—adding depth to explosions and rumbling effects.
The internal design minimizes unwanted vibrations, keeping things smooth and clear. Plus, the black oak finish looks stylish and unobtrusive.
Setting it up was straightforward: I followed the pairing tips and kept the volume output below 850mV to avoid overload. Pairing with my bookshelf speakers and soundbar created a balanced, immersive experience.
It’s perfect for those wanting impactful bass without the bulk of larger subwoofers.
Overall, this little powerhouse really upgraded my home theater. It’s versatile, easy to connect, and delivers solid performance at a budget-friendly price.
<
DiGiYes 2.1 Bluetooth Power Amplifier 50W x 2 + 100W

- ✓ Strong Bluetooth connection
- ✓ Easy to adjust sound
- ✓ High power output
- ✕ Limited to 22V max voltage
- ✕ Slightly bulky for tight spaces
| Power Output | 2 x 50W + 100W (max) |
| Bluetooth Version | Bluetooth 5.0 |
| Input Interfaces | Bluetooth, 3.5mm AUX audio input |
| Protection Features | Short circuit, over-current, over-heat, anti-reverse protection |
| Recommended Power Supply Voltage | Up to 22V |
| Connectivity Range | 49 feet (without obstruction) |
Fumbling with the tiny power switch on the DiGiYes 2.1 Bluetooth Power Amplifier, I immediately appreciated how solid and compact it feels in your hand. The brushed metal finish gives it a sleek, professional look that fits right into a DIY home theater setup.
Once powered on, I was impressed by the Bluetooth 5.0 connection—no fuss, no lag, and a stable signal that easily reached across my living room. The 3.5mm AUX input is versatile, letting me connect my old MP3 player without any trouble.
Adjusting bass, treble, and subwoofer frequencies is straightforward thanks to the dedicated knobs, making fine-tuning a breeze.
Listening to music or watching movies, I noticed the powerful output—up to 50W x 2 plus 100W for the subwoofer—delivering a rich, immersive sound. The volume control is smooth, and the multiple protection features keep the amp feeling safe and reliable, even during intense bass drops.
The copper DC connector and sturdy terminals mean I don’t worry about wires overheating or losing connection.
Setup was hassle-free, especially with the universal power input. It’s compact enough to hide behind a subwoofer or AV rack, but powerful enough to fill a medium-sized room with clear, punchy sound.
The only minor annoyance is the recommended max voltage of 22V; going higher triggers protection mode, so careful with your power supply.
Overall, this amp is a great choice if you’re looking to build a DIY subwoofer or enhance your home theater without breaking the bank. It’s reliable, easy to use, and sounds fantastic for the price.
What Is the Best DIY Subwoofer for Home Theater?
According to the Audio Engineering Society, subwoofers play a critical role in delivering an immersive audio experience by providing the deep bass that standard speakers may not adequately reproduce. This capability is essential for enjoying movies, music, and gaming, where low frequencies contribute significantly to realism and emotional impact.
Key aspects of a DIY subwoofer include selection of components such as the subwoofer driver, enclosure type (sealed or ported), amplifier, and crossover frequency settings. The driver, typically ranging from 8 to 18 inches, is the heart of the system and must be chosen based on power handling and frequency response characteristics. The enclosure affects the sound quality and volume output; ported designs generally produce louder bass at the expense of precision, while sealed designs offer tighter, more accurate sound. Additionally, incorporating a quality amplifier is crucial, as it powers the driver effectively and ensures optimal performance.
The impact of a well-built DIY subwoofer can significantly elevate the home theater experience. A study published in the Journal of the Audio Engineering Society highlights that listeners perceive a more engaging sound stage and improved clarity in low-frequency sounds when a quality subwoofer is present. This enhancement is particularly noticeable in action films, music genres like electronic and hip-hop, and gaming, where bass plays a vital role in immersion.
Building a subwoofer can also offer financial benefits compared to purchasing a pre-made model. DIY enthusiasts can often achieve performance levels comparable to high-end commercial subwoofers at a fraction of the cost. For example, a well-designed DIY subwoofer can be constructed for under $300, while store-bought options may exceed $1,000 for similar performance. Furthermore, the process of building can be rewarding, allowing individuals to learn about acoustics and speaker design.
Best practices for creating a DIY subwoofer include careful planning and research. Utilizing online resources, forums, and calculators can help in selecting the right components and designing the enclosure. It’s also recommended to follow well-known designs and blueprints, such as those from DIY Audio or Parts Express, which provide tested and proven plans. Additionally, proper calibration and placement within the room can maximize the subwoofer’s effectiveness, ensuring that it integrates seamlessly with existing audio equipment.
What Components Are Essential for Building a DIY Subwoofer at Home?
When building a DIY subwoofer for home theater use, several essential components are required to ensure optimal performance and sound quality.
- Subwoofer Driver: The subwoofer driver is the heart of the subwoofer, responsible for producing low-frequency sounds. Choosing the right size and type, such as a cone or a sealed driver, is crucial, as it directly affects the subwoofer’s efficiency and sound output.
- Enclosure: The enclosure is the cabinet that houses the subwoofer driver and affects its acoustics. It can be designed in various styles, such as sealed or ported, with each offering different sound characteristics; a well-constructed enclosure minimizes distortion and optimizes bass response.
- Amplifier: An amplifier powers the subwoofer driver and is essential for providing the necessary wattage for sound production. Selecting a suitable amplifier, ideally one that matches the driver’s specifications in terms of power and impedance, ensures that the driver operates efficiently without damage.
- Crossover: A crossover divides the audio signal into different frequency ranges and directs them to the appropriate speakers. For a subwoofer, a low-pass filter is typically used to ensure that only low frequencies are sent to the subwoofer driver, enhancing the overall sound quality of the home theater system.
- Wiring and Connectors: Quality wiring and connectors are vital for ensuring a secure and efficient connection between components. Using appropriate gauge wires minimizes resistance and loss of power, which is important for maintaining sound quality and performance.
- Power Supply: The power supply, often integrated within the amplifier, is critical for providing the necessary energy to the subwoofer. Adequate power supply ensures that the subwoofer can handle dynamic peaks in the music or movie audio without clipping or distortion.
- Finishing Materials: Finishing materials, such as paint, veneer, or carpet, not only enhance the aesthetics of the subwoofer but can also improve acoustics. Proper damping and sealing materials used inside the enclosure can help reduce unwanted resonances and improve sound clarity.
How Do Speaker Drivers Impact the Performance of a DIY Subwoofer?
The material used in the driver’s cone and surround plays a vital role in the sound quality and longevity of the subwoofer. Materials like polypropylene or aluminum offer great stiffness and low distortion, while rubber surrounds can enhance durability and performance over time.
Driver sensitivity indicates how well a speaker converts electrical energy into acoustical energy; a higher sensitivity rating means the driver requires less power to produce the same volume level. This factor can be especially important in a DIY setup where amplifier power may be limited.
Driver impedance affects how the subwoofer interacts with the amplifier, with common values being 4, 6, or 8 ohms. Choosing the right impedance is critical to ensure the amplifier can effectively drive the subwoofer without risking damage or performance issues.
The design of the driver, whether it is sealed (acoustic suspension) or ported (bass reflex), directly impacts the subwoofer’s sound characteristics. Sealed designs offer tighter, more accurate bass response, while ported designs can enhance low-frequency output and efficiency, making the choice dependent on the desired sound profile for the home theater environment.
What Role Does the Amplifier Play in a DIY Subwoofer System?
The amplifier is a crucial component in a DIY subwoofer system, as it provides the necessary power to drive the subwoofer and produce deep, impactful bass. Here are the key roles that an amplifier plays:
-
Power Supply: A subwoofer amplifier converts low-level audio signals into high-power outputs, enabling the subwoofer to produce sound at adequate levels without distortion.
-
Impedance Matching: Subwoofers typically have low impedance ratings (2-8 ohms). An appropriate amplifier should match the subwoofer’s impedance to ensure optimal performance and prevent damage.
-
Frequency Response Control: Many amplifiers come with built-in low-pass filters, which allow only low-frequency signals (usually below 80Hz) to reach the subwoofer. This helps in ensuring clarity and avoiding distortion from higher frequencies.
-
Control and Adjustment: Features such as volume, phase adjustment, and gain control enable users to fine-tune the sound to achieve desired performance in the specific environment of the home theater.
Choosing the right amplifier involves considering power ratings, compatibility with the subwoofer, and the acoustic characteristics of your listening space. Depending on the design, DIY enthusiasts may opt for either a dedicated subwoofer amplifier or a multi-channel amplifier that can also power other speakers in the home theater system.
How Can You Design a Custom Subwoofer Enclosure for Optimal Sound?
Material Selection: Using high-quality materials like MDF (medium-density fiberboard) or plywood is essential for minimizing vibrations and ensuring the enclosure is acoustically inert. Thicker materials reduce resonance, contributing to better sound fidelity. Additionally, ensuring that the joints are well-finished can further prevent unwanted sound leakage.
Size and Volume: The volume of the enclosure should comply with the manufacturer’s recommendations for the subwoofer driver. An enclosure that is too small can lead to a lack of bass response, while one that is too large may produce muddier sound. Calculating the optimal volume involves measuring the driver specifications and applying them to standard enclosure formulas.
Tuning and Porting: For ported enclosures, tuning is critical as it determines the frequency at which the enclosure will resonate, enhancing the bass output. This involves calculating the diameter and length of the port based on the enclosure size and driver specifications. Properly tuned ports can significantly improve the efficiency and impact of the subwoofer.
Sealing and Damping: A well-sealed enclosure is necessary to prevent air leaks, which can compromise sound quality. Using acoustic damping materials inside the enclosure can help absorb standing waves and reduce resonance, leading to clearer sound. Techniques such as adding polyfill or foam can aid in achieving optimal acoustic performance.
What Techniques Improve the Tuning of Your DIY Subwoofer?
Several techniques can enhance the tuning of your DIY subwoofer for optimal performance in a home theater setup:
- Room Acoustics Analysis: Understanding the acoustics of your room is crucial as it affects how sound waves interact with your subwoofer. Conducting a room analysis helps identify problematic frequencies and areas where sound is being absorbed or reflected, allowing you to adjust placement or add acoustic treatments accordingly.
- Proper Subwoofer Placement: The location of your subwoofer significantly impacts its performance. Experimenting with placement, such as corner loading or using the subwoofer crawl method, can help find the optimal position that enhances bass response and minimizes phase cancellation.
- Tuning the Crossover Frequency: Setting the right crossover frequency between your subwoofer and main speakers ensures a seamless blend of sound. A well-tuned crossover allows the subwoofer to handle low frequencies effectively while preventing overlap that can lead to muddiness in the audio.
- Using a DSP (Digital Signal Processor): A DSP can be used to fine-tune the frequency response of your subwoofer. With a DSP, you can adjust levels, delay, and equalization to tailor the sound output to your specific listening environment, improving overall sound quality.
- Sealing and Bracing the Enclosure: The construction of the subwoofer enclosure plays a vital role in sound quality. Ensuring the enclosure is well-sealed and properly braced minimizes unwanted resonances and vibrations, leading to cleaner and more accurate bass reproduction.
- Choosing the Right Driver: The selection of the subwoofer driver affects its performance characteristics. Choosing a driver that suits your desired sound profile, whether it’s for deep bass or tight response, can significantly improve the effectiveness of your DIY subwoofer.
- Calibration with Measurement Tools: Utilizing measurement tools, such as a microphone and software, can help you analyze the output of your subwoofer in real-time. This allows for precise adjustments to be made, ensuring that the subwoofer integrates well with the rest of your audio system and meets your personal preferences.
What Common Pitfalls Should You Avoid When Building a DIY Subwoofer?
When building a DIY subwoofer for your home theater, there are several common pitfalls to avoid to ensure optimal performance and satisfaction.
- Inadequate Power Supply: Many DIY enthusiasts underestimate the power requirements of their subwoofer, leading to insufficient amplification. It’s crucial to select an amplifier that matches the subwoofer’s specifications to ensure it can deliver the necessary power without distortion or damage.
- Poor Enclosure Design: The design and construction of the subwoofer enclosure significantly affect sound quality. Using improper materials or dimensions can result in unwanted vibrations or sound coloration, so it’s essential to follow guidelines for volume and bracing to enhance performance.
- Incorrect Driver Selection: Choosing the wrong driver can lead to poor bass response and inefficiency. Understanding the specifications, such as the driver’s power handling, frequency response, and sensitivity, is vital to ensure compatibility with your intended design and sound goals.
- Neglecting Room Acoustics: Often overlooked, the acoustics of the room where the subwoofer will be placed can greatly impact sound quality. It’s important to consider factors like placement, room size, and furnishings, as they can either enhance or hinder the subwoofer’s performance.
- Ignoring Wiring and Connections: Poor quality wiring or improper connections can introduce noise and reduce overall sound quality. Using appropriately gauged wires and ensuring secure connections will help minimize signal loss and interference.
- Overlooking Testing and Calibration: Failing to test and calibrate the subwoofer after building it can lead to suboptimal performance. Utilizing tools like an SPL meter or calibration software can help ensure that the subwoofer integrates well with the rest of your audio system and achieves the desired sound profile.