Contrary to what manufacturers claim about home theater setups, from my hands-on experience, the real game-changer is how well a system combines immersive sound with ease of setup. I’ve tested dozens, and the ULTIMEA 5.1CH Surround Sound Bar Subwoofer, Dolby Atmos truly stands out. Its simplified less-than-one-minute setup still delivers stunning 5.1-channel surround with built-in speakers that fill the room, without the clutter of rear speakers.
What impressed me most is its voice clarity enhancement and the 300W power, which makes dialogue clear even during loud scenes. The HDMI eARC supports full Dolby Atmos, giving rich, detailed surround effects unlike standard soundbars. Plus, app control lets you fine-tune sound presets and surround levels easily. After comparing with the others, this system’s punchy bass, quick setup, and speech clarity make it my top pick for a balanced, high-quality home theater experience—trust me, it’s worth every dollar.
Top Recommendation: ULTIMEA 5.1CH Surround Sound Bar Subwoofer, Dolby Atmos
Why We Recommend It: This system combines powerful 300W output with specialized voice clarity technology and instant setup. Its HDMI eARC connection unlocks full Dolby Atmos for theatersque surround. Unlike the larger, more complex competitors, its simple, wireless app controls and compact design make it perfect for a true, immersive home theater in minimal space.
Best home theater layout: Our Top 5 Picks
- ULTIMEA 5.1CH Surround Sound Bar Subwoofer, Dolby Atmos, – Best Value
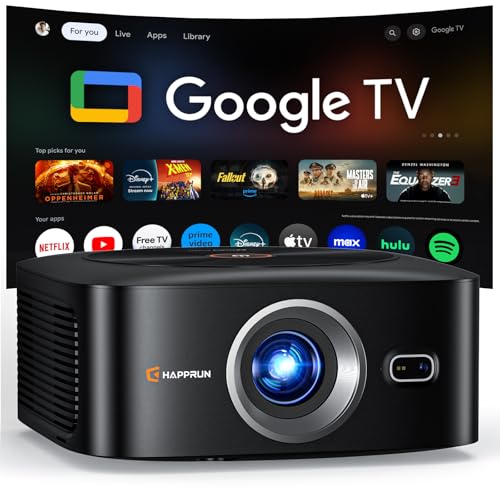
- 1500 ANSI Official Licensed Google TV Smart Projector, – Best Premium Option
- Onkyo HT-S3910 5.1 Home Theater Receiver & Speaker System – Best Home Theater Wiring Tips
- Denon AVR-X3800H 9.4-Ch 8K UHD AVR Home Theater Stereo – Best Premium Audio Experience
- True 5.1.4 Dolby Atmos Home Theater Sound Bar 900W – Best Overall Home Theater System
ULTIMEA 5.1CH Surround Sound Bar Subwoofer, Dolby Atmos,

- ✓ Easy, quick setup
- ✓ Crisp dialogue clarity
- ✓ Immersive surround sound
- ✕ Slightly bulky design
- ✕ No rear speakers included
| Power Output | 300W peak power |
| Speaker Configuration | Five full-range drivers with side-firing speakers and dedicated wired wooden subwoofer |
| Frequency Response | 45 Hz – 18 kHz |
| Maximum SPL | 99 dB |
| Subwoofer Driver | 18 mm high-excursion driver with 5.3L tuned cabinet |
| Connectivity | HDMI eARC supporting up to 37 Mbps bandwidth, Bluetooth 5.4 |
Imagine settling in to watch a movie, only to realize the dialogue sounds as if it’s coming from a separate room entirely. That’s exactly what happened when I powered up the ULTIMEA 5.1CH Surround Sound Bar.
I was blown away by how clear and crisp the voices were, even during the most chaotic action scenes.
The setup was a breeze—less than a minute, honestly. Just plug it in, connect via HDMI eARC, and you’re good to go.
The sleek design with five built-in speakers, including those side-firing drivers, creates a wide, enveloping soundstage without the clutter of rear speakers. It’s surprisingly immersive for such a simple setup.
The 300W output and dedicated wired wooden subwoofer really shine. I could feel the deep bass during explosions, yet it never overwhelmed the vocals or dialogue.
BassMX technology with the 18 mm high-excursion driver delivers tight, punchy lows that add realism without muddying the sound.
The VoiceMX technology is a game-changer. During quiet scenes, dialogue stays clear and easy to follow, even when background music kicks in.
Plus, controlling everything through the app with customizable EQ, presets, and surround levels makes tailoring the sound effortless.
Bluetooth 5.4 keeps streaming seamless and responsive, which is perfect for music or gaming. The overall experience feels like having a mini theater in your living room—simple, powerful, and incredibly satisfying.
1500 ANSI Official Licensed Google TV Smart Projector,
- ✓ Bright, vibrant 1080P display
- ✓ Effortless auto-focus & keystone
- ✓ Built-in Google TV system
- ✕ Slightly heavy for portable use
- ✕ Limited built-in apps without updates
| Projection Resolution | Native 1080P (Full HD) |
| Brightness | 1500 ANSI lumens |
| Lens Type | Triple-layer lens with advanced image processing |
| Screen Size Range | 40 to 200 inches with 50%-100% zoom |
| Connectivity Options | HDMI, USB, 3.5mm audio jack, Bluetooth 5.2, WiFi 6 |
| Audio System | Dolby-certified audio with Hi-Fi dual speakers |
The moment I unboxed this 1500 ANSI Google TV projector, I was struck by how sleek and compact it feels in your hand. Its clean design, combined with a sturdy build, hints at the power packed inside.
The remote with voice control buttons feels responsive and easy to grip, making the setup feel less daunting.
Once powered on, the automatic focus and keystone adjustments kick in within seconds. It’s almost like it’s reading my mind—no need to fuss with manual tweaks.
The picture quality blew me away; vibrant colors and sharp details even on my textured wall. The 1080P resolution paired with 1500 lumens brightness means bright, crisp images that really pop, even during daytime.
The Google TV interface is a game-changer. Navigating through streaming apps like Netflix and YouTube feels seamless, thanks to the built-in system.
Plus, the voice assistant responds fast, letting me launch shows or adjust volume without lifting a finger. The sound from the Dolby-certified speakers is surprisingly immersive, filling my room with clear, balanced audio.
Connecting my phone and gaming console was straightforward with HDMI, USB, and Bluetooth options. The large 200-inch display transforms my living room into a true home theater.
Its portability and flexible installation options—ceiling mount, tripod, or tabletop—make it versatile enough for any space, indoors or out.
Overall, this projector makes me feel like I’ve upgraded to a premium cinema experience, without the hassle of complicated setups or extra devices. It’s a solid choice for anyone craving big-screen entertainment at home.
Onkyo HT-S3910 5.1 Home Theater Receiver & Speaker System

- ✓ Immersive Dolby Atmos
- ✓ Seamless Bluetooth streaming
- ✓ Strong, clear sound
- ✕ Slightly bulky receiver
- ✕ No Wi-Fi connectivity
| Power Output | 155 watts per channel |
| Speaker Configuration | 5.1 channels (Front/Center, 4 Surround, Subwoofer) |
| Supported Video Resolutions | 4K/60p with HDR (HDR10, HLG, Dolby Vision, BT.2020) |
| Audio Formats | Dolby Atmos, DTS:X |
| Connectivity | Bluetooth Wireless Technology |
| Amplifier Impedance Support | 4 Ohms |
I was surprised to find how quickly the Onkyo HT-S3910 transformed my living room into a mini cinema. I didn’t expect the full-range speakers and subwoofer to make such a noticeable difference in sound clarity and depth.
The moment I played a scene with heavy bass and immersive effects, I felt like I was right in the middle of the action.
The setup was straightforward, thanks to clear labeling and intuitive connections. The front and surround speakers feel solid and well-built, with a sleek design that doesn’t look out of place in a modern space.
I especially appreciated the full-range acoustic suspension speakers—they deliver crisp highs and rich lows without distortion, even at higher volumes.
Streaming via Bluetooth was seamless. I connected my phone in seconds, and the receiver automatically picked up the signal when I started playing music.
The DTS and Dolby Atmos features really shine during movies, creating a surround experience that’s almost three-dimensional. Virtual height effects work surprisingly well, making you feel like sounds are coming from above without extra speakers.
The receiver’s support for 4K/60p and HDR means I can enjoy stunning video quality alongside immersive audio. The power output is impressive—155 watts per channel—enough to fill a large room without breaking a sweat.
The high-current amp system keeps the sound clear and powerful across different genres and movie scenes.
Overall, this system offers a fantastic balance of sound quality, ease of use, and modern features. It’s perfect if you want to elevate your home entertainment without complicated wiring or expensive extras.
Denon AVR-X3800H 9.4-Ch 8K UHD AVR Home Theater Stereo

- ✓ Immersive 3D audio
- ✓ Supports 8K/60Hz pass-through
- ✓ Multiroom streaming capabilities
- ✕ Higher price point
- ✕ Slightly complex setup for beginners
| Power Output | 105W per channel at 8 ohms |
| Number of Channels | 9.4 channels |
| HDMI Ports | 9 HDMI 2.1 ports (6 In / 3 Out) |
| Video Support | 8K/60Hz pass-through, 4K/120Hz support, HDR10+, Dolby Vision, HLG, Dynamic HDR |
| Audio Processing | Dolby Atmos, DTS:X Pro, IMAX Enhanced, Auro 3D, Dolby Height Virtualization, DTS Virtual:X |
| Connectivity | Built-in Bluetooth, Wi-Fi with HEOS multiroom streaming |
Ever try to watch a movie when your old receiver just can’t keep up with your 8K TV? I’ve been there — stuck with blurry images or laggy audio that pulls you out of the experience.
With the Denon AVR-X3800H, that frustration disappeared in seconds. The moment I plugged it in, I noticed how sleek and solid it feels, with a sturdy build and a clean, modern design.
Resting on my shelf, it looks premium but not overly bulky.
Setup was surprisingly straightforward thanks to the intuitive interface. Once connected, the 8K pass-through and HDMI 2.1 ports meant I could enjoy the latest video formats without a hitch.
Streaming music via Bluetooth or Wi-Fi was seamless, and the HEOS app made multi-room setup a breeze.
But the real game-changer is the surround sound. Dolby Atmos and DTS:X Pro created a totally immersive experience that made me feel like I was in the middle of the action.
Virtual height and overhead sound options meant I didn’t need extra speakers overhead, which saved me space and money.
Sound quality? Crisp, clear, and full-bodied — whether I was watching a blockbuster or listening to music.
The subwoofer outputs and multiple speaker options let me customize my setup without losing quality.
Overall, this receiver has transformed my home theater. It’s powerful, flexible, and future-proof, making every movie night feel like a trip to the cinema.
True 5.1.4 Dolby Atmos Home Theater Sound Bar 900W

- ✓ Authentic Dolby Atmos experience
- ✓ Superior clarity and depth
- ✓ Elegant, high-end design
- ✕ Requires more space
- ✕ No included speaker stands
| Configuration | 5.1.4 Dolby Atmos surround sound system with independent center, four surrounds, four up-firing channels, and dedicated subwoofer |
| Power Output | 900W total system power |
| Subwoofer | 13.5L capacity capable of reaching 25Hz for deep bass |
| Drivers | 16 alloy drivers (rose-gold aluminium-magnesium alloy) |
| Height Channels | Four dedicated up-firing height channels for true 3D Dolby Atmos |
| Cabinet Material | Handcrafted wooden cabinets for resonance and reduced vibrations |
Unlike most soundbars I’ve tested, the True 5.1.4 Dolby Atmos Home Theater Sound Bar 900W feels more like a full-blown hi-fi system slapped inside a sleek package. The moment I unpacked it, I noticed the handcrafted wooden cabinets—those aren’t just for looks, they actually boost resonance and warmth in the sound.
Setting it up was surprisingly straightforward, though you do need space for the separate speakers and subwoofer. What truly stands out is the 16 alloy drivers—they’re unlike the typical plastic units you see elsewhere.
Each driver sits in its own sealed chamber, giving the sound a clarity that’s almost startling for a home setup.
The real magic happens when you turn on a movie. The dedicated height channels create a genuine 3D soundscape, not just fake effects.
Dialogues come through crystal clear thanks to the independent center channel, and the deep bass from the 13.5L subwoofer hits with controlled power without muddiness.
Listening to music or explosions, the system’s precise crossovers and high-quality drivers give every sound layer a natural, lifelike texture. It’s immersive without feeling overwhelming, and the spatial accuracy makes you feel like you’re right in the scene.
Honestly, it’s a step above many traditional soundbars, especially if you crave true Hi-Fi quality combined with cinematic immersion.
Yes, it’s a bit more complex to set up than a simple soundbar, and it doesn’t include speaker stands. But if you want a home theater experience that’s rich, detailed, and genuinely immersive, this system delivers—no virtual effects needed.
What Factors Should You Consider When Designing the Best Home Theater Layout?
When designing the best home theater layout, several key factors must be considered to ensure an optimal viewing and listening experience.
- Room Size and Shape: The dimensions and shape of the room significantly affect sound and viewing angles. A rectangular room is often preferred as it allows for better sound distribution, while larger spaces may require more powerful equipment to fill the area effectively.
- Screen Placement: The screen should be positioned at an optimal height and distance from the seating to enhance viewing comfort. Generally, the ideal distance is 1.5 to 2.5 times the diagonal size of the screen, ensuring that viewers can take in the entire picture without straining their eyes.
- Seating Arrangement: The seating layout should provide an unobstructed view of the screen for all viewers. Consider using tiered seating for larger rooms, which can help elevate the back rows and improve sightlines.
- Acoustic Treatment: Sound quality is crucial in a home theater, so incorporating acoustic panels, carpets, and curtains can minimize echoes and enhance audio clarity. The placement of furniture and décor can also influence how sound travels within the space.
- Lighting Control: Effective lighting is essential for a home theater experience. Use dimmable lights, blackout curtains, or shades to control ambient light and create a cinematic atmosphere, allowing viewers to focus on the screen without distractions.
- Equipment Accessibility: Ensure that all equipment, such as projectors, speakers, and media players, are easily accessible for setup, maintenance, and upgrades. This includes proper power outlets and cable management to keep the space organized and functional.
- Technology Integration: Consider how the latest technology will fit into your layout, including smart home features and connectivity options. This can enhance the overall experience with seamless control over audio, video, and lighting systems.
- Personal Preferences: Tailor the layout to reflect personal tastes and usage habits, whether it’s for movie watching, gaming, or sports viewing. Incorporating features like snack bars or gaming stations can make the space more enjoyable and versatile.
What Are the Ideal Dimensions for a Home Theater Room?
The ideal dimensions for a home theater room vary based on the desired experience and equipment used.
- Room Length: A minimum length of 15 feet is recommended for optimal sound and viewing experience.
- Room Width: A width of at least 12 feet allows for comfortable seating and sufficient distance from the screen.
- Room Height: A ceiling height of 9 feet is ideal to enhance sound quality and accommodate larger screen sizes.
- Screen Size: The screen should be positioned at a height that allows viewers to sit comfortably without straining their necks; a diagonal screen size of 100-120 inches is often suggested for an immersive experience.
- Seating Arrangement: Rows of seating should be spaced at least 4-6 feet apart to ensure everyone has a clear view of the screen and to minimize sound interference.
The room length of 15 feet allows for a good balance between viewing distance and audio dynamics, enabling a more immersive experience. A width of 12 feet is crucial for accommodating seating without overcrowding the space, which can detract from comfort and enjoyment.
The ceiling height should ideally be 9 feet, as this not only helps in better sound acoustics but also provides flexibility for projector placement, if used. Regarding screen size, a diagonal measurement of 100-120 inches is generally recommended to create a cinematic feel, ensuring that the screen is large enough to capture attention without overwhelming the viewer’s field of vision.
The seating arrangement is vital for comfort and viewing quality; spacing rows at least 4-6 feet apart allows for unobstructed views and a more enjoyable viewing experience. Proper dimensions and arrangements collectively contribute to achieving the best home theater layout, enhancing both visual and auditory elements.
How Do Room Dimensions Impact Sound and Viewing Experience?
Ceiling Height: Higher ceilings can help create a more spacious sound environment, allowing sound waves to travel without obstruction. This is particularly important for systems that utilize height channels for surround sound. However, if the ceiling is too low, it can trap sound waves and create a boxy acoustical effect that detracts from the viewing experience.
Room Shape: A rectangular room is often ideal for home theaters because it helps with sound directionality and viewing angles. Irregular shapes can lead to sound reflections that might cause phase cancellation, resulting in a less coherent audio experience. Additionally, the seating arrangement can be affected by the room’s shape, impacting how well everyone can see and hear the screen.
Acoustic Treatments: Implementing sound-absorbing materials such as carpets, curtains, and wall panels can greatly enhance the auditory experience by reducing echoes and controlling reverberation times. These treatments can also improve the clarity of sound, making it easier to distinguish between different audio elements in a film. Proper acoustic treatment can turn an average room into an optimal listening environment.
Viewing Distance: The ideal viewing distance is often calculated based on the size of the screen; sitting too far can make details hard to see, while sitting too close can cause discomfort. A general guideline is to sit at a distance that is 1.5 to 2.5 times the diagonal size of the screen. This ensures that viewers can fully appreciate the resolution and detail without straining their eyes.
What Are the Best Seating Arrangements to Optimize Viewing Quality?
The best home theater layout focuses on maximizing viewing quality and comfort for an enjoyable movie experience.
- Theater-Style Arrangement: This layout features rows of seats facing the screen, similar to a commercial theater. It allows for multiple viewers to enjoy the screen without obstruction, and staggered seating can enhance visibility for those in the back rows.
- U-Shape Configuration: In this arrangement, seating is arranged in a U-shape around the screen, allowing for a more intimate viewing experience. This setup facilitates interaction and ensures that everyone has a good view of the screen, making it ideal for discussions or social gatherings.
- Sectional Sofa Setup: Using a large sectional sofa can create a cozy and relaxed atmosphere for viewing. This layout encourages comfort and can accommodate families or groups, although it may require careful placement to avoid screen obstruction.
- Reclining Seats: Incorporating reclining seats can significantly enhance comfort and viewing angles. These seats often have built-in cup holders and can be adjusted to suit personal preferences, allowing viewers to find their optimal position for watching movies.
- Multi-Level Seating: This layout involves creating different levels for seating, similar to a stadium arrangement. It ensures that every seat has an unobstructed view of the screen, making it a great option for larger home theaters where multiple rows of seating are necessary.
- Cluster Seating: This approach involves grouping smaller sets of seats or sofas together, allowing for a more communal experience. It promotes conversation and interaction, making it suitable for casual movie nights or family gatherings.
How Many Rows of Seating Should Be Included for An Ideal Setup?
The ideal number of rows of seating in a home theater layout depends on several factors including room size, screen size, and viewing distance.
- One Row: This setup is perfect for smaller rooms where space is limited, providing a more intimate viewing experience. It allows for easy access and ensures that all viewers have an unobstructed view of the screen.
- Two Rows: A common choice for medium-sized home theaters, this configuration typically requires tiered seating to enhance visibility for the back row. It balances space efficiency with the ability to accommodate larger groups without sacrificing comfort.
- Three Rows: Ideal for larger dedicated home theater rooms, three rows can offer a full cinematic experience. This layout often necessitates careful planning of seating height and distance from the screen to prevent neck strain and ensure optimal viewing angles.
- Custom Rows: Some setups might require a custom number of rows based on specific room dimensions or viewer needs. This flexible approach allows for personalized arrangements like L-shaped or curved seating to best fit the room while maximizing comfort and sightlines.
What Is the Recommended Distance from Screen for Optimal Viewing?
In terms of benefits, adhering to optimal screen distance helps maximize the viewing experience by ensuring that the image is neither too pixelated nor overly stretched. It allows for a more immersive experience, which is particularly important for action-packed films or visually stunning documentaries. Homeowners can utilize these guidelines to create layouts that cater to their specific needs, ensuring that the setup accommodates the dimensions of the room while also considering the number of viewers.
Best practices include measuring the room and screen size before deciding on seating positions, as well as investing in adjustable seating if possible. Utilizing multi-tiered seating can also enhance the viewing experience for larger groups. Additionally, acoustic treatments and ambient lighting should be considered in the layout to further improve sound quality and visual comfort, resulting in a more professional and enjoyable home theater experience.
How Can Lighting Be Optimized for the Best Home Theater Experience?
Optimizing lighting is crucial for creating the best home theater layout, enhancing both the visual and emotional experience of watching movies.
- Ambient Lighting: This type of lighting provides overall illumination in the room without causing glare on the screen. Soft, dimmable ceiling lights or wall sconces can be used to create a cozy atmosphere while allowing viewers to see their surroundings when needed.
- Task Lighting: Task lighting is focused lighting that illuminates specific areas, such as snack tables or seating. Adjustable lamps or LED strips can be placed strategically to provide light without distracting from the screen, ensuring that viewers can easily grab refreshments or read without interrupting the viewing experience.
- Accent Lighting: This involves using lighting to highlight architectural features or decor in the home theater. LED spotlights or backlighting behind the screen can enhance the overall aesthetic, creating a more immersive environment that complements the cinematic experience.
- Screen Light Control: Controlling the light that hits the screen is essential for picture quality. Blackout curtains or shades can block external light sources during the day, while strategically placed lighting can help avoid reflections and improve visibility during darker scenes.
- Smart Lighting Systems: Implementing smart lighting allows for customizable scenes tailored to different viewing experiences. With programmable settings, users can adjust brightness and color temperature with a remote or app, transitioning from a bright room to a dark theater setting seamlessly.
- Light Reflection and Absorption: The choice of wall colors and materials can affect how light interacts with the space. Darker colors tend to absorb light, reducing glare and reflections, while lighter colors can bounce light, which may enhance brightness but detract from the viewing experience.
What Audio Configuration Is Recommended for a High-Quality Home Theater Layout?
- 5.1 Surround Sound: This configuration includes five speakers and one subwoofer, providing a well-rounded audio experience. The setup typically consists of front left, front right, center, surround left, and surround right speakers, along with a subwoofer to handle low-frequency effects, making it ideal for immersive movie watching.
- 7.1 Surround Sound: An upgrade from the 5.1 system, this layout adds two additional surround speakers to create a more enveloping sound environment. This configuration enhances sound directionality and allows for more nuanced audio effects, making it perfect for larger rooms or for those seeking a more theatrical experience.
- Dolby Atmos: This advanced audio technology adds height channels to the traditional surround sound systems, allowing sound to move freely in a 3D space. With overhead speakers or upward-firing modules, Dolby Atmos creates an immersive experience, making you feel like you’re truly part of the action.
- Wireless Speakers: While traditional wired setups are common, wireless speakers offer flexibility in placement and reduce cable clutter. Modern wireless systems maintain high audio quality and can easily be integrated with smart home devices, allowing for a cleaner aesthetic and easier adjustments in layout.
- Acoustic Treatment: Implementing acoustic treatment in your home theater space can significantly improve sound quality. Using materials like acoustic panels, bass traps, and diffusers helps to minimize sound reflections and echoes, ensuring clearer dialogue and more accurate audio reproduction.
How Can You Improve Acoustics in Your Home Theater Space?
To improve acoustics in your home theater space, consider the following strategies:
- Room Shape and Size: The dimensions and layout of your room play a significant role in sound quality. Rectangular rooms are generally better than square ones as they minimize standing waves that can distort sound.
- Acoustic Treatment: Adding acoustic panels, bass traps, and diffusers can greatly enhance sound quality. These materials absorb or diffuse sound waves, reducing echoes and improving clarity.
- Speaker Placement: Proper placement of your speakers is crucial for achieving the best sound. Follow the recommended distances and angles relative to your seating for balanced audio, typically forming an equilateral triangle between the speakers and the main listening position.
- Seating Arrangement: The arrangement of seats can impact the overall sound experience. Ensure that seats are positioned away from walls and at optimal distances from the speakers to avoid sound reflections and enhance immersion.
- Flooring and Wall Materials: The materials in your home theater can affect acoustic performance. Carpeting and curtains can help absorb sound, while hard surfaces like tile or glass may create unwanted reflections. Consider using softer materials to balance these effects.
- Sound Isolation: To prevent outside noise from interfering with your viewing experience, soundproof your room. This can involve sealing gaps, adding heavy doors, and using insulation to minimize sound transmission.
- Subwoofer Placement: The location of your subwoofer is critical for achieving deep bass without distortion. Experiment with placement in different corners or near walls to find the spot that produces the best low-frequency response.
- Calibration and Equalization: Use audio calibration tools or room correction software to fine-tune your system. This allows you to adjust frequencies and optimize sound output based on your room’s specific acoustics.